
Figure 1. EFT Waveform with Measurement Error Simultaneously Displayed

Address: P. O. Box 1457, Los Gatos,
CA 95031
TEL:
800-323-3956/408-356-4186
FAX:
408-358-3799
Mobile: 408-858-4528
URL:
www.dsmith.org
Email: doug@dsmith.org
Figure 1. EFT Waveform with Measurement Error Simultaneously Displayed
The scope display in Figure 1 above is instructive as a measurement technique and at the same time shows a characteristic of an Electrical Fast Transient (EFT) waveform. Figure 1 shows one of many pulses in a burst that is part of the IEC 61000-4-4 EFT test. Let's talk about the measurement setup first.
Figure 2 shows an IEC 61000-4-4 capacitive clamp fastened around a 1.5
meter cable that is connected to ground through a load on each end. The
clamp is one meter long and either end of it can be connected to the EFT
generator. The clamp body and the ground plane below form an approximately
50 Ohm impedance transmission line that is not terminated on either end
except for the capacitance to the cable and the driving generator impedance.
For the purposes of this test, Load 2 was an open circuit and Load 1 was
a 150 Ohm resistor representing the
equipment under test,
EUT.
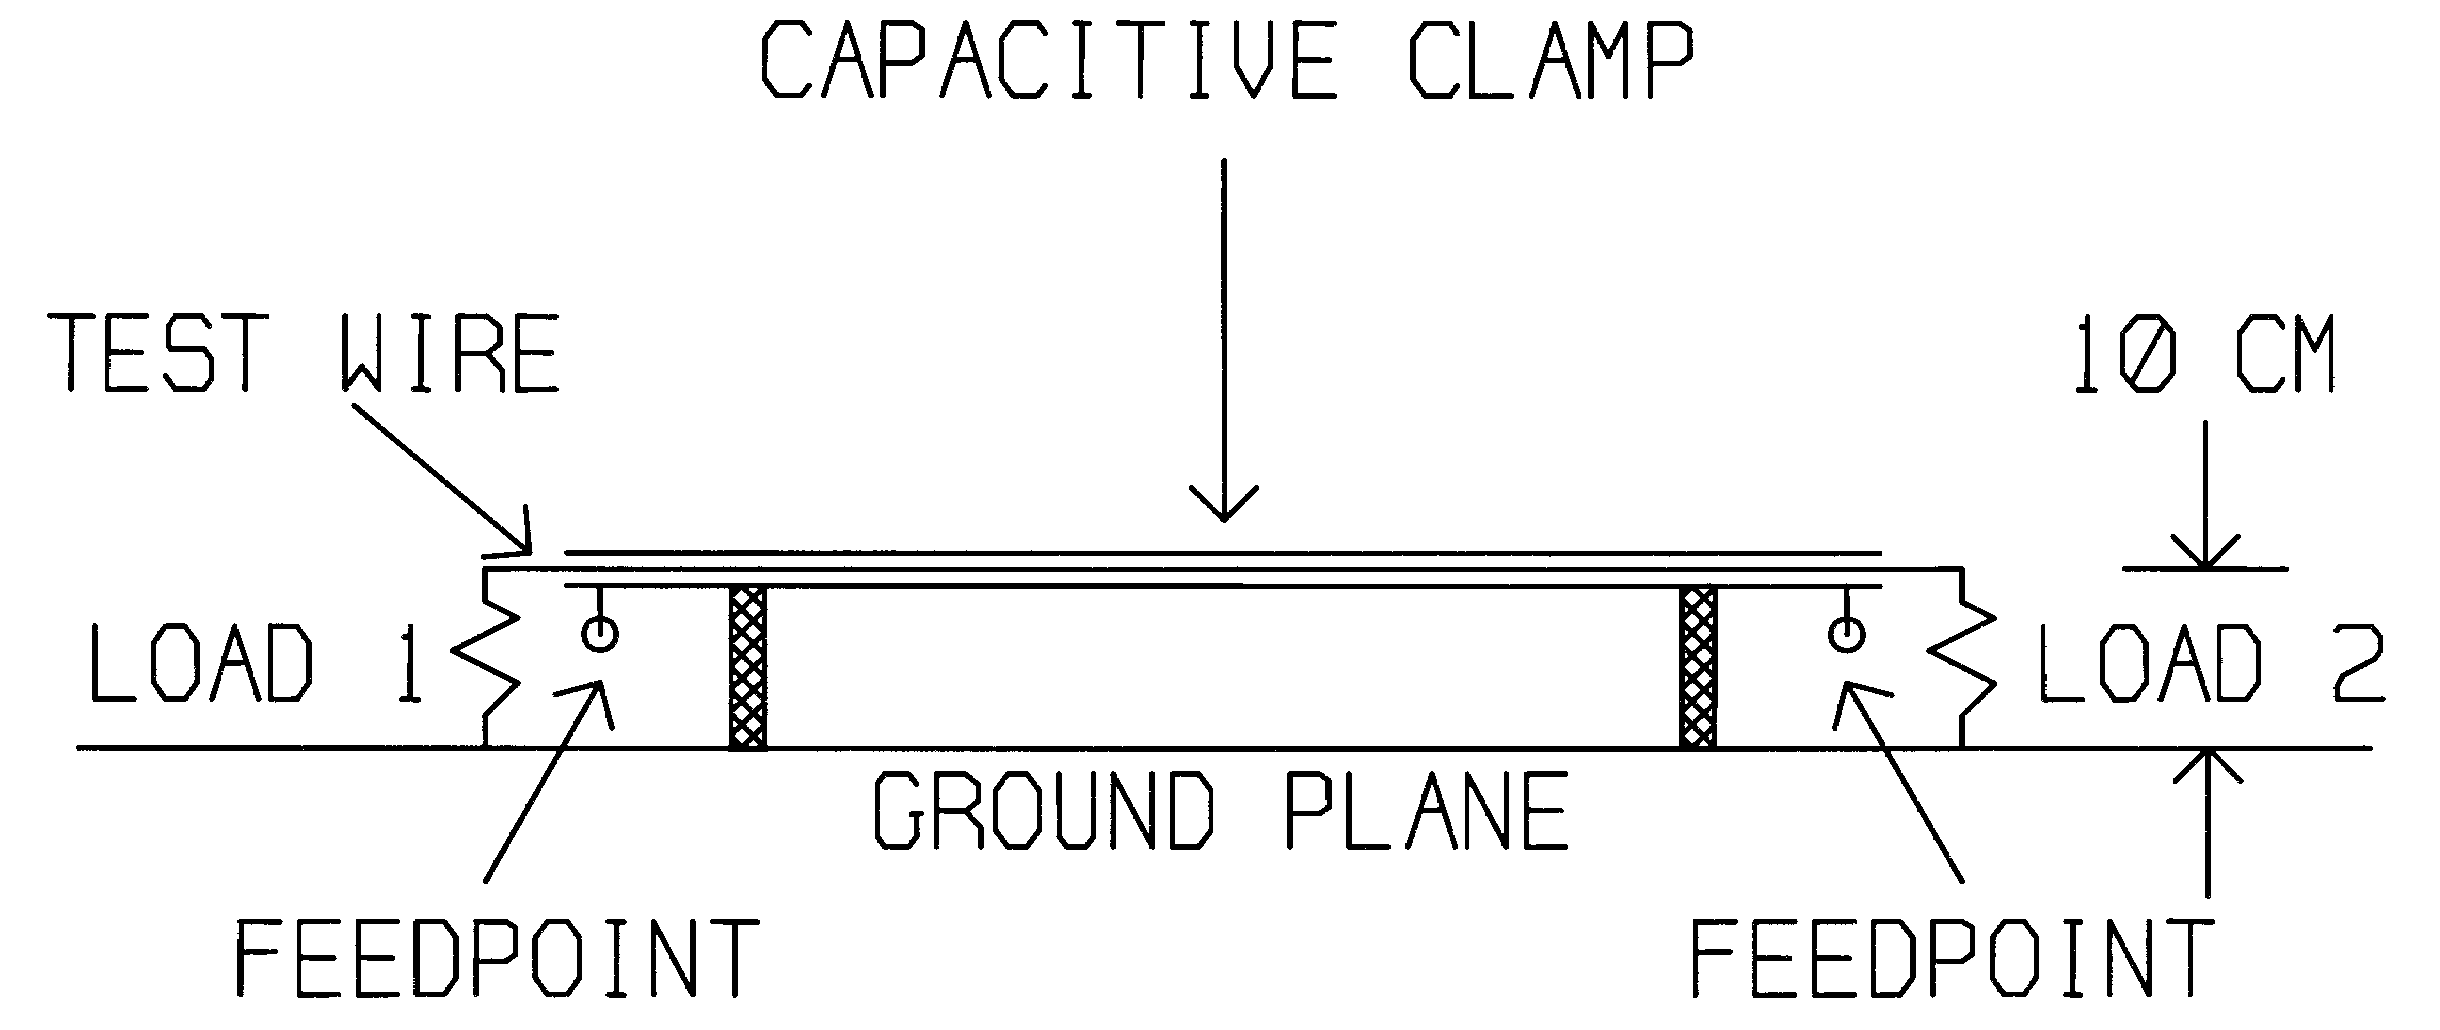
Figure 2. IEC 61000-4-4 Capacitive Clamp Test Setup
For more information on the IEC 61000-4-4 EFT test itself, a brief discussion
is located at http://www.keytek.com/emc/eft_test.htm.The
linked document includes a picture of how the capacitive clamp is used
to inject EFT energy onto signal cables. That picture is shown below as
Figure 3.
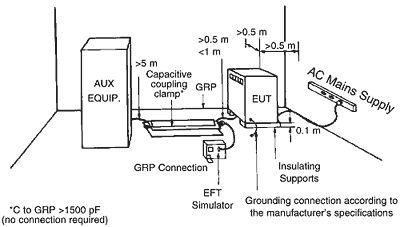
Figure 3. EFT Test Setup From KeyTek EFT Link
A pair of Fischer F-33-1 current probes with matched responses were placed around the wire attaching to Load 1. The two probes were oppositely placed on the cable so that their outputs should be inverted with respect to each other if their outputs were only due to the magnetic field caused by current flowing in the wire. The upper trace of Figure 1 shows the current waveform from one probe when the EFT was injected into the feedpoint of the capacitive clamp near Load 1. A level of 500 Volts of EFT was used and since the Fischer probes have a transfer impedance of about 5 Ohms, the vertical scale is about 1 Amp/division. The lower trace is the sum of the outputs of the two current probes.
If the two current probes are only responding to the current flowing through them, the cable shields are adequate, all connectors are making good contact, and the scope amplifiers are well matched, then the sum shown in the lower trace should be near zero. To the extent that these conditions are not met, error is present in the measurement and it will be displayed in the lower trace. This happens because the current signals are out of phase and cancel in the lower (error) trace, but leakage due to poor shielding will either have the same phase or be only present on one channel and thus show up in the error trace.
The error trace is a check on the complete measurement chain for gain differences or poor shielding allowing EMI to affect the measurement. I have often seen the error trace suddenly show a signal. Upon wiggling the BNC connectors, it went back to near zero again! A real time measurement check such as this is very important when making measurements around ESD or EFT because of the large amount of EMI generated by these events.
Now the interesting part concerning EFT. In Figure 1, the EFT is applied on the Load 1 side of the clamp with Load 2 being an open circuit. The two bumps are due to the initial pulse and its reflection off the open end of the clamp that appears about 8 to 10 nanoseconds later. This is enough time delay so that the two pulses have distinct peaks. This is the way that EFT is applied according to the IEC 61000-4-4 test.
Figure 4 below shows what happens if the EFT is applied to the Load 2 side of the clamp. Since the end of the transmission line formed by the clamp and the ground plane is effectively not terminated on the Load 1 side, the pulse arrives at the Load 1 end with the incident and reflected pulses lining up. This makes the two peaks overlap and a much greater stress is applied to the EUT. I have seen several test labs make this mistake. It seems counter-intuitive, but the least stress on the EUT occurs when the EFT generator is connected to the EUT end of the clamp as IEC 61000-4-4 calls for.
Figures 1 and 4 were taken from my 1996 EOS/ESD Symposium paper titled
An
Investigation into the Performance of the IEC 1000-4-4 Capacitive Clamp.
To view that paper, click here (~150K).
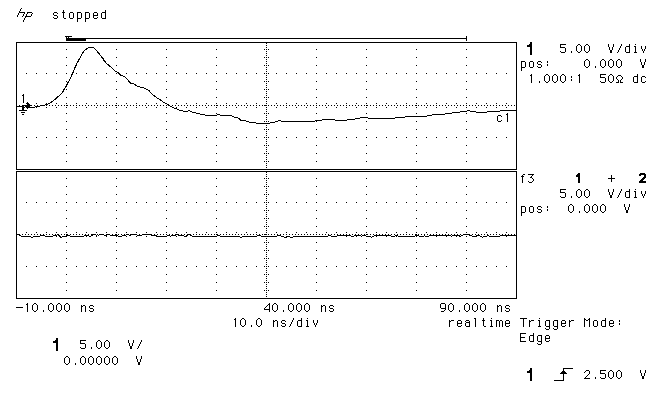
Figure 4. Current Through Load 1 With EFT Applied to Load 2 Side of Clamp