Discussion: The
July Technical Tidbit presented a method of measuring breakdown and charging objects that required the use of a
KeyTek MiniZap
ESD simulator. The method to be presented here will work with most ESD
simulators. ESD simulators, other than the MiniZap, charge a capacitor
and switch it to the output making it difficult to charge objects to a known voltage.
Sometimes a series of contact discharges are used to accomplish the
purpose, but this exposes the equipment to the substantial stress of
the contact discharges which may cause problems with the operation of the system.
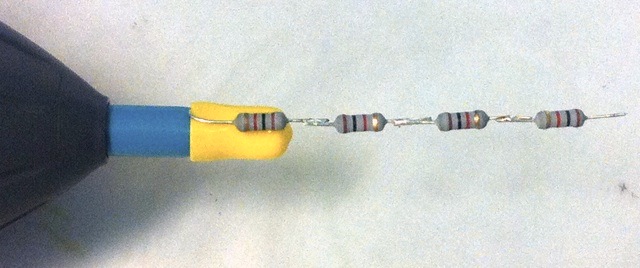
Figure 1 shows a series string of four 1 KOhm resistors mounted on the tip of a
NoiseKen ESS-S3011 ESD Simulator.
The purpose of
the string of resistors is to reduce the effect of a series of contact
discharges used to charge up the desired object and prevent problems
caused by the contact discharges. The resistors should be two Watt 5%
tolerance resistors to be able to withstand the contact discharges.
Guidance on resistor selection is given in my
June 2009 Technical Tidbit, Effect of High Voltage Pulses on Resistors - ESD and EFT.
Use of an air discharge tip on the ESD simulator is desirable, even
though contact discharges are being used, to make connection of the
resistors to the tip easier and more reliable. In Figure 1, the
resistor lead is held in place against the air discharge tip using a
plastic cap (a 3/8 inch vacuum port cover for automobile intake
manifolds that is available in auto part stores).
Four 1K Ohm resistors allows a relatively quick charging of the
object
while still reducing the peak current of the contact disharges. For
instance, if one has an object with a capacitance of 20 pF then the RC
time constant of the resistors and object would be 4*10**3 Ohms x
20*10**-12 Farads
= 80 *10**-9 or 80 nanoseconds, slow enough to even out the peak
current of the contact discharges that last a only few nanoseconds for
an
IEC 61000-4-2 simulator. For a 20 pF object, only a few contact
discharges will be necessary to charge the object to near the ESD
simulator setting whereas for larger objects more discharges may be
necessary. It is unlikely to need more than ten contact discharges to
reach a voltage near the ESD simulator setting for most objects to be
charged. It is best to check that the charge is not bleeding off too
quickly, such that the desired voltage may not be reached, using a
static field meter. These instruments are not usually very accurate but
are adequate for this purpose.
The method used to charge an object or measure breakdown voltage is as follows:
- Mount the resistor string on the ESD simulator and connect the tip of the resistor string to the object.
- Fire the simulator in contact mode until the object is
charged as confirmed by calculation or measurement. Ten discharges are
usually more than enough except for the largest objects.
- Remove the resistors from touching the object as quickly as possible after completing the contact discharges.
- If
it is desired to measure breakdown use either a static field meter to
indicate when the charge on the object suddenly reduces or a current
probe on a cable connected to the object to indicate the discharge
current.
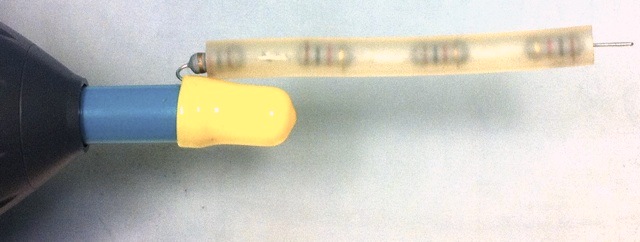
Figure 2 shows the series string of resistors covered with an
insulating sleeve. Use of the sleeve may be needed when charging to
high voltages, for instance 25 kV, to prevent sparking directly to
the connections between the resistors.
Using
an ESD simulator this way, one can measure
breakdown voltage and charge objects up to 30,000 Volts. It is
important that the
ESD simulator not have leakage from the tip back into the simulator to
prevent bleeding off charge during the test. This can be checked with a
static field meter.


